Printing and Print Options
How to Print Your Deck
You do not have to print all your cards every time. The Filter features let you choose which cards are printed, and which are not. Improper use of filtering can cause some cards to be omitted from printing and exporting. Please be sure you understand filtering to ensure that you print all the cards you want printed.
Printing is the recommended way to create print-and-play decks for prototyping. If you wish to create output for uploading to print-on-demand services or for digital gaming platforms, see About Exporting.
To print your cards, use the standard Page Setup and Print commands.
You can print directly on paper, but we recommend printing to a PDF document instead. This allows you to preview the printed output before spending paper and ink, and allows you to distribute your deck to others simply by sharing the PDF file.
About Page Size and Orientation
You may select any page size and orientation by using the Page Setup and Print commands.
Multideck will print as many cards per page as will fit within the page's printable area. The printed area is centered on the page. If necessary, Multideck will rotate your card images 90° in order to fit more cards per page.
Print Options in the Print window
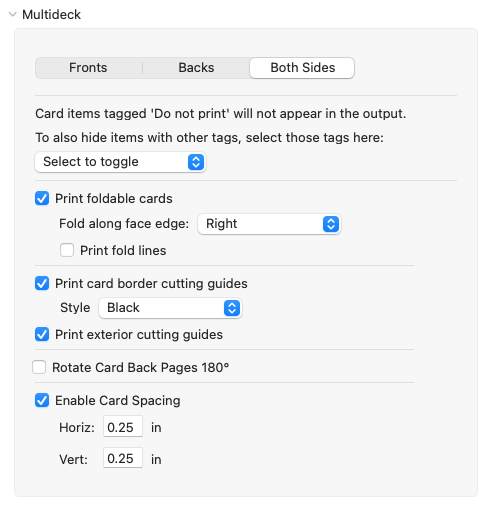
When you print a document, you can control a number of options using the controls in the Multideck section of the standard Print window.

Print options in the Multideck section of the Print window
Choosing which sides to print
Use the selector at the top of the print options to print only the front sides, only the back sides, or both sides of your cards. (Backs and Both Sides are available only if your deck is two-sided. See Setting Up a New Deck for more information about created two-sided decks.)Foldable cards
Foldable cards enable printing of two-sided cards with perfect alignment of the front and back artwork. When you select this option, each card's front and back are printed side-by-side on the same side of the paper, as a double-sized image. You can cut out the double-sized image, then fold in the middle to make a two-sided cardYou may choose which edge of the card front is the one to fold, and you can choose whether or not to print a line to show exactly where to fold the card.
Cutting Guides
You may print borders around your cards, to aid you in cutting them out precisely. Four styles are available; choose the one that best suits your cards and your preference. For example, White may be the best choice if your cards all have dark backgrounds. Or, to avoid lines at the edges of your cards, you might prefer the Corner crosshairs option.
Exterior cutting guides are lines drawn to the edges of the page (or as close as your printer will allow) to help you line up your scissors or cutting device.
Rotate Card Back Pages 180°
Some printers can print both sides of the paper in a single print run. By default, Multideck assumes that the "up" direction of the artwork will be the same for both fronts and backs. If your printer doesn't do this, select the Rotate Card Back Pages 180° option.Card Spacing
Select the Enable Card Spacing checkbox, then enter your desired horizontal and vertical spacing between cards.By default, cards are printed close-packed on each page, so that you can cut them out with a minimal number of cuts. But you can use the Print Options dialog to specify an arbitrary spacing between cards. This is suitable for pre-perforated paper, and for double-sided printing (so that cards can be printed with a bleed area to compensate for registration inaccuracies).