Using Guides for Alignment
About Guides and Snapping Items to Guides
Guides are vertical or horizontal lines that stretch across your layout. You can see them in Multideck when you are not in Preview mode, but they never appear on your printed or exported cards and card images.Guides help you align and position the items on your cards. As you drag an item, its edges or center will "snap" to align with a guide when the item is close enough.
If you select a group of items and drag the group, the group acts as if it were a single item whose bounds are the union of the bounds of all of the selected items. The group as a whole will snap its edges or center to a guide, but the individual items will keep their positions relative to each other. (This is different from using the Align buttons and menu commands, which align all the selected items to each other.)
Guides also affect dragging when resizing items. In this case, it's the dragged edge that snaps to the guide, not the union of all selected items. Other selected items will simply resize to match the primary item, as usual.
Guides (if enabled, see below) still cause snapping even in Preview mode when you can't actually see the guides.
Creating Guides
The new guide will appear in your layout, and be placed along the bottom edge of your card (if horizontal) or the left edge (if vertical).
Moving Guides by Dragging
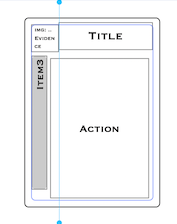
Each guide has two "control knobs", one at each end. These are always at the edges of your layout panel; if you see a guideline but no knobs, then you may have to scroll your layout view to see one of its edges.
The blue line is a vertical guide, with control knobs at its top and bottom ends.
To move a guideline, drag either of its knobs to the position you want.
Enabling and Disabling Guides
Sometimes you may not want items to snap to a guide, but you still want the guide so you can use it later. Disabled guides have no effect on dragged items. When you want to use the guide again, enable it by clicking its knob again.
Deleting Guides
Any changes you make to a guide can be undone and redone, so if you delete a guide by accident, just use the Undo command to get it back.
You can delete all of the guides from your layout by selecting the menu command Arrange > Guides > Delete All.
More Options: the Guide Contextual Menu
In the popup menu, you can select Enter Location to type in a precise position for the guide.
Several options are available in the menu for precisely positioning the guide: you can move the guide to the card's edges, center, and safe margins; or move it to align with a group of selected card items.
There is also a Delete command in the menu, which has the same effect as ⌘-clicking the knob: the guide is deleted.