Setting Up Templates
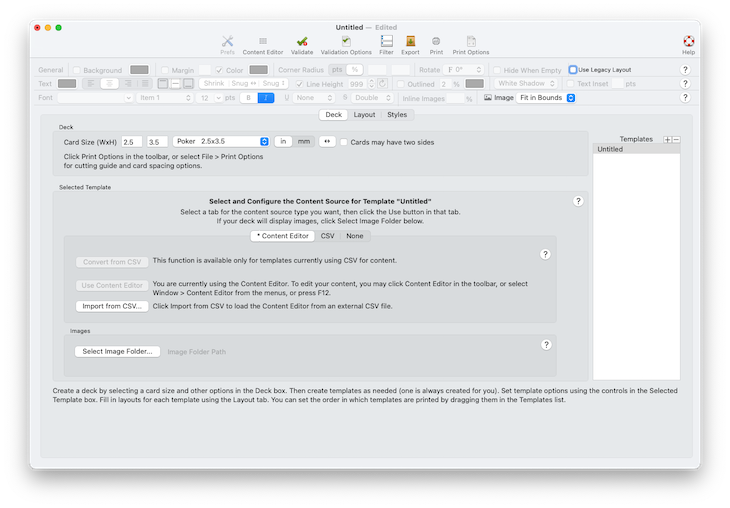
Every deck has at least one template. Templates are listed in the Deck and Layout tabs, in the scrolling list on the upper right area of the tab panel. A new document will have a single template named "Untitled".

The main window, with the Deck tab selected,
and showing the template list on the right side of the Deck panel.
Use the + and - buttons at the upper-right of the list to create new templates and delete existing ones. Note that there is always at least one template: if you delete the only template, a new blank one is automatically created.
Templates will be printed in the order shown in the list. To change the order, you may drag templates within the list.
To select a template in the list, click once on the template or use the keyboard to select the one you want.
To edit a template's name, select the template and press Return. Enter the new name, and press Return again when you are done. (A template's name is for your convenience; it will not affect printed output.)
Selecting and Configuring a Content Source
Every template requires a content source, which will provide the actual content (e.g. titles, images, flavor text, and such) for the template's cards. The content source also defines how many cards will be produced by the template: any number from one on up.There are three types of content source you can choose from:
- The Content Editor
- An External CSV File
- "None"
The Content Editor
We recommend using the Content Editor for most purposes. It allows you to create and edit your deck's content right in Multideck, and instantly see your edits and additions as you type.New documents and new templates use the Content Editor by default. If your existing template does not use the Content Editor but you would like to convert to using it, see Switching to the Content Editor.
Click the Use Content Editor button only if you wish to switch to the Content Editor without automatically importing any data. If your document has previously used the Content Editor, that data will remain unchanged and will now be visible and editable again in the Content Editor.
If you are already using the Content Editor but would like to replace all content by importing from a CSV file, click the Import from CSV button. This will delete all existing content and replace it with the content from the CSV file.
CSV Files
An external CSV file is the way that Multideck versions before v4.0 got content. CSV files are usually created and edited by entering your content into a spreadsheet document, using any spreadsheet app you like, and then exporting the spreadsheet data to a new file in CSV format for Multideck to read in.Tell me about creating CSV files for Multideck.
Once you have created a CSV file, configure your template by selecting the CSV tab, then click the Use a CSV File button. The buttons below will become enabled.
Click Select a CSV File and choose your CSV file. Select the character encoding of your CSV file from the popup CSV Encoding button. While we recommend Unicode (UTF-8) for its compactness and its ability to render nearly any character from any language, you may specify a different encoding if necessary. For example, we understand that some or all versions of Microsoft Excel for Mac cannot export CSV in UTF-8 encoding, and instead use Mac OS Roman encoding. (If you don't understand about character encodings and Multideck isn't reading your CSV correctly, you can try experimenting with this popup to see what works.)
"None"
The "None" content source is special. It is possible to specify content for card items right in the Layout editor, without needing a content source. This is a simple way to create things like player aids, player mats, side boards, and the like, where you either need only one copy or where all copies will be identical.To use "None", select its tab and click the Use None button. Then enter the number of cards you want this template to create using the Copies field.
Selecting an Image Folder
If your template will use external images to be displayed on your cards, you must specify an Image Folder. (This is the same for all content source types.)
The image folder should contain all of the image files that will be displayed by the template.
If you have many images, you can create sub-folders inside the Image Folder, and place some or all of your image files in those sub-folders.